Installing the BSDs
The bhyve functionality in TrueNAS Core provides a simple interface for creating virtual machines. FreeBSD works very smoothly (as may be expected since bhyve was originally written for FreeBSD). Creating virtual machines for the other members of the BSD family is slightly less straightforward. There exist good resources for getting NetBSD installed (9.x here, and you can make that work with 8.x by following this).
OpenBSD
There are a couple of older resources to get OpenBSD installed on a TrueNAS Core virtual machine. But they seem either out of date or somewhat more complicated than I found necessary.
Preparing the Disk
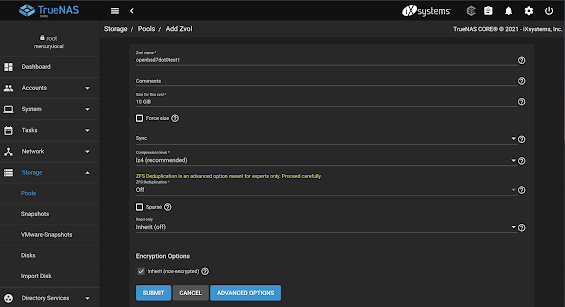
We can't install the OpenBSD operating directly on a virtual disk created by the VM Wizard. So, we need to manually create a
zvol to use. In the TrueNAS interface, go to
Storage >
Pools and browse to the location where the rest of your virtual machine zvols are. Click the three-dot menu on the right of the filesystem and select
Add Zvol. Give the new zvol a name and a size. Defaults are fine choices for everything else.
The next thing we need to do is dd the minirootXY.img file to the newly created zvol. These are readily available for download for each release from the OpenBSD website
here. You can download manually, or simply use fetch:
# fetch https://cdn.openbsd.org/pub/OpenBSD/7.0/amd64/miniroot70.img
Next, we use dd to write that to the zvol we created above:
# dd if=/mnt/tank/files-local/OS_Images/OpenBSD/amd64/7.0/miniroot70.img of=/dev/zvol/tank/virtual-machines/openbsd7dot0test1 bs=1m
Creating the Virtual Machine
Now that we have manually created the disk, the rest of the installation process is fairly standard (although, console-based).
You can create a virtual machine using the Wizard. Most default options are fine. On Step 1 Operating System, we can unselect Enable VNC since we need to do a text-based install from the console. On Step 3 Disks, we need to choose Use existing disk image and set Select Disk Type to VirtIO. Now, under Select Existing zvol, we choose the zvol we created above.
Set
Adapter Type on
Network Interfaces to
VirtIO as well. Leave the
Installation Media blank since we already have in place what we need to boot (the result from dd above). And then on
Confirm Options, click
Submit.
Booting the Installation
Now, we can start the virtual machine. Expand the details and click Start. Once the button is available, click on Serial. From here, we need to get the output on our serial connection. At the boot> prompt, issue the command: set tty com0
We should be back to the boot> prompt now. Simply issue the command: boot
Installation
From here, we can do a pretty standard
installation of OpenBSD. After selecting the root disk, we do need to manually edit the bootable partition. We use
(E)dit and then
edit 3 to edit the bootable partition.
Leave the defaults until we get to partition size. By default, we get a pretty small partition. The size you choose here depends on the size of the zvol you created earlier. It's easy enough to just use the max size here.
Once that's set, we type
quit and then use the auto layout (or custom if you so desire). From here, all the defaults are fine. Since the filesets didn't come with the img we downloaded, we'll need to specify the HTTP Server to get them from. If it's not pre-populated, you can use
cdn.openbsd.org
Once all filesets have been installed, we can then reboot.
Validating
At this point, we should have a functioning OpenBSD installation that we can access via ssh!


